Saturday, January 17

Create Google logo in 3 easy steps

It is the most easy method of creating Google logo.

1. Create a new document of any size. Using type tool type 'Google' in your document. The font I have used is Catull. If you don't have you can also use Times new roman font.
2. As we know each letter of Google has different colors. Highlight each letter and change its color to:

G #1645AE
o #D62408
o #EFBA00
g #1645AE
l #007D08
e #D62408



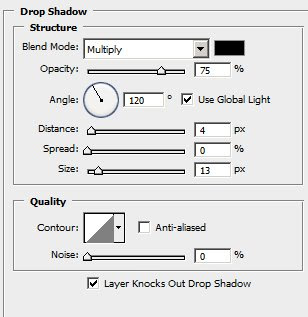
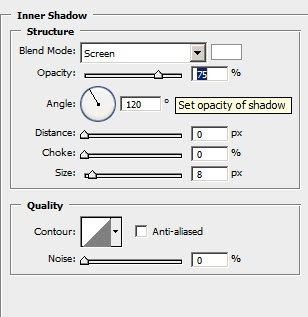
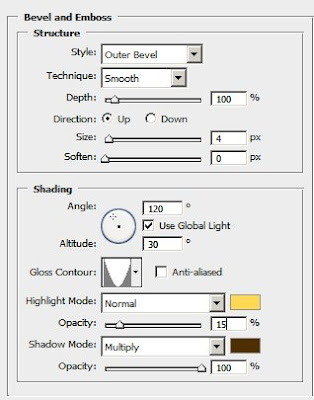
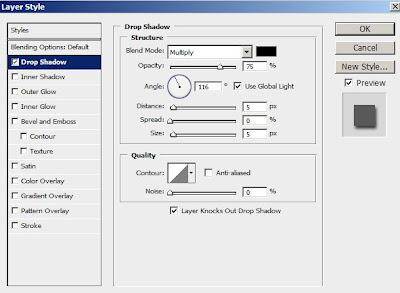
3.Double click the text layer to open layer style window and apply following settings:


Here is the final result.


Wednesday, January 14

Realistic Ipod shuffle player

This tutorial is about to make realistic Ipod shuffle player. Lets do it!

1. Download an apple Ipod shuffle image. The image of ipod shuffle should be at least 400pixels wide.


Open that image and start making guides.
(To make guides rulers should be visible. Press Ctrl+R to show the ruler. To make guides drag from the horizontal ruler to create a horizontal guide OR drag from the vertical ruler to create a vertical guide. You can also move and delete guides.)

Create guides for the edges of Ipod shuffle and the borders of click wheel.


Why we are doing this is that to make sure that the click wheel of ipod is in the proper alignment.


2. Hide the sample image after making guides(you can show and hide guides anytime using Ctrl+;).

Select the rounded rectangle tool with 5pixel radius and make sure that shape layers are selected in the options palette.


Make sure that View->Snap to->Guides are selected and draw the rectangle(Color:#cd3e90) proportion to the guides we made for the edge of the player.


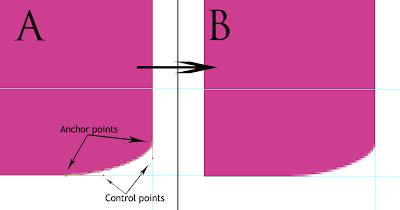
3. The Ipod shuffle is not perfect rectangle so we have to change the shape of corners. Select Direct selection tool and change the anchor points of the corners(A).


Make changes to both anchor points and control points. Press enter to get the results(B).


Repeat for all the corners(Make sure to press enter after changing the points of each corner).


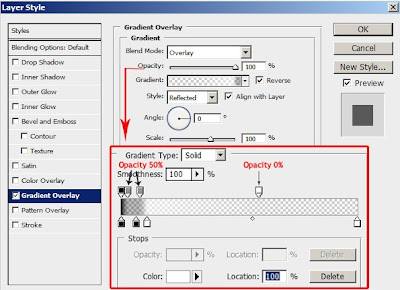
4. Now we have to create Shadows and highlights. It can be achieved easily by using layer style. Double click the rectangle layer to open the layer style window to apply gradient overlay. And apply following settings:


5. Now we have to make click wheel. Select the Ellipse tool with white color and make the circle shape proportion with the guides made for click wheel.


Then with the ellipse tool selected choose Exclude overlapping shape areas from the options palette.


Draw the inner circle proportionate to the guides.


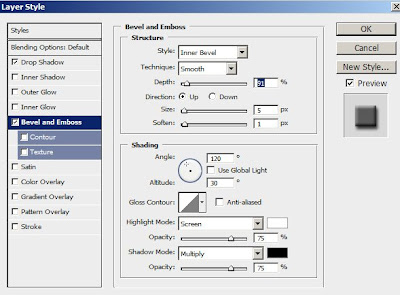
6. To make the click wheel more realistic we are going to add some layer style to it. Double click the circle shape layer to open the layer style window and apply following settings:


7. Lets add some buttons. Use rectangle tool to make these shapes(Color#c0c4c7):


Use the polygon tool with 3 sides(see options palette of polygon tool) to create remaining buttons.

8. The ipod shuffle surface is not smooth, its a bit grainy. Duplicate the rectangle tool and change the color to black. Right click and select rasterize layer, then go to Filter->Noise->Add noise and apply following settings:


Change the opacity to 2% and the blending mode to multiply.

So the final outcome is:


You can try in various colors:


Sunday, January 11

Realistic running water

This tutorial has very easy and simple steps to create this wonderful effect. Only step that is Warp transformation needs some practice.


1. Create a new file with dimensions 500*500pixels.

2. Create a new layer. Press d to sett default foreground and background color. Go to Filter->Render->Clouds.


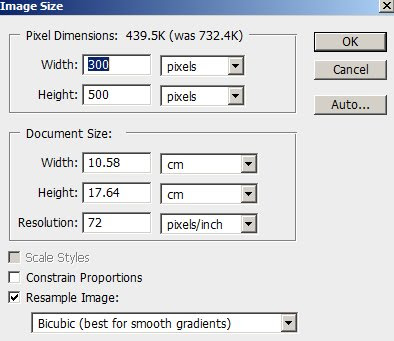
3. Go to Filter->Blur->Gaussian blur. Set the radius to 6pixels. Then go to Filter->Blur->Motion blur. Set the angle to 90degree and distance to 80pixels. Next go to Image->Image size and set the following settings:


4. Go to Filter->Artistic->Plastic wrap and apply following settings:


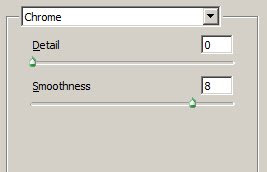
Go to Filter->Sketch->Chrome and apply following settings:


5. Then go to Edit->Fade chrome and set blending mode to Hard light.


6. Go to Image->Image size and apply following settings:


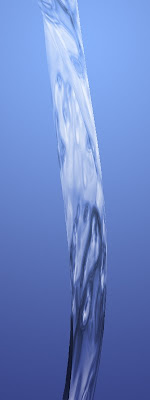
7. Now go to Edit->Transform->Warp. Move the anchors so that it is shaped as running water. See the following image to get an idea:


Add some background color or gradient(It's better to use blue shade so that the effect looks realistic) and change the running water layer's blending mode to Hard light.


I have resized the water layer and used it with a tap.


Amazing glowing text

This is a very lengthy tutorial but it is very easy to create this effect.


1. Create a new document of any size. Change the background color to some dark color. I have used color #200c20. Don't use pure black.

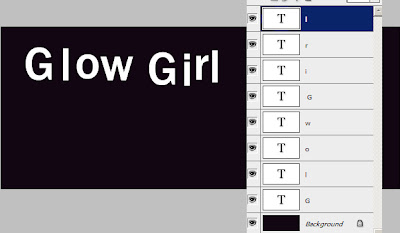
2. You would have always typed a word or sentence continuously using type tool. But here to achieve the desired effect we are going to type each letter in a new layer. Select the type tool and type some text, so that each letter is in new layer. The font I have used is Franklin Gothic and I have typed 'Glow Girl'


3. Now we have to align all the texts there is a easiest method to do it. Select move tool. Move the first text(in my case 'G') where you want the text to start. Select all the text layers from the layer window.(Select the first text layer, hold down shift key and then select the last text layer in the layer window). Now move all the texts so that it is slightly overlapped one another.(Make sure that the all the bottom edges are aligned. If you are using mouse to move the letters then hold down the shift key while moving so that it stays aligned).


4. Create a new layer at top of all text layers. Create a white to transparent using Gradient tool, so that the white part stays at top of the work area. Make sure that the text falls on the faded part of the gradient.


5. Ctrl click the first text layer's thumbnail in the layer window and select the gradient layer. Press Ctrl+C to copy and then Ctrl+V to paste. A new layer will be created. Repeat this for all the letters.


6. Its better name all the copied layers so that it will be easy to work out further. Create a new layer. Ctrl click the first text layer(you will be getting a error message, ignore it) ad fill with some bright color in the newly created layer(make sure that the new layer is selected while filling the color). Change the blending mode to screen. Repeat this for all the letters with each letter with different colors.


7. Now if you are satisfied with the placement of letters you can merge it. Merge all the gradient layers by selecting them and pressing Ctrl+E. Then merge all the color layers by selecting them and pressing Ctrl+E.


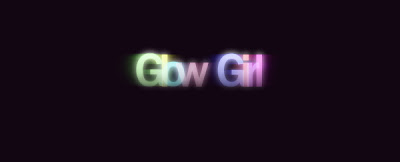
8. Now duplicate the gradient text layer. Name it gradienttext2 and change the opacity to 15%. Again duplicate the gradient text layer with 100% opacity and change the name to gradienttextblur. This layer should be over gradienttext2. Go to Filter->Blur->Gaussian blur. I have set the radius to 2.2pixels. Again duplicate the gradient text layer with 100% opacity and change the name to gradienttextblur2. This layer should be over gradienttextblur. Go to Filter->Blur->Gaussian blur. Set the radius more now. I have set to 4.7pixels. Now your text appear as it is glowing.


9. Duplicate the colored text layer. Change the blending mode to opacity. Then go to Filter->Blur->Gaussian blur and set the radius to 1.2pixels.
Using erase tool select soft brush delete the lower part of the color text layer. Again duplicate the color text layer and change the blending options to linear dodge. Go to Filter->Blur->Motion blur. I have set the Angle to 90 degree and distance to 10pixels. Again duplicate the color text layer and change the blending mode to color dodge and apply motion blur. Set the distance to 25pixels.


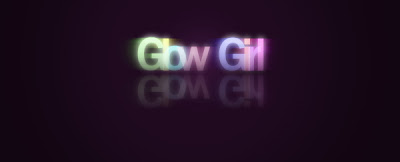
10. Now merge all these layers. Duplicate the final layer and transform it so that it appears as reflection. Add layer mask and fill it with Black to white gradient. And reduce the opacity to 40%.


11. Create a new layer above the background layer. Using a bigger soft white brush and use it at centre of the text and change the blending option to overlay. Again create a new layer above the previous layer. Using a more bigger soft white brush and use it at centre of the text and change the blending option to overlay.

The final result.


Monday, January 5

3D Golden text

It is my favorite text effect. It's very easy and simple to create because it uses only the layer styles. In this tutorial I'm gonna apply styles to two different text layers overlapping each other so that it gives a 3D look.
1. Create a new document of any size. You can add some background color and some gradients effects if you like. Using type tool enter some text. Choose any of your favorite fonts. Don't bother about the color.


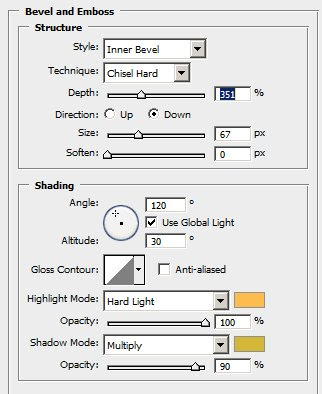
2. Now duplicate this layer. Now select the top most text layer and double click it to bring layers style window. And apply following 6 settings:


The text will look similar to:


3. Select and double click the second text layer and apply following 3 layer style settings:


So the second text layer should look similar to:


4. Now with the second text layer selected, select the move tool and press 'down' key in your keyboard 2 or three times. This will give 3d look to the text.

Final result:


Best thing about creating text effect only with layer styles is that you can save the styles and reuse it again.