Sunday, May 25

Add color to your black and white image.

Add color to your black and white image.

1. Open any black and white image. I have selected the following image.


2. Duplicate th image by selecting Layer -> Duplicate layer.

3. Choose brush tool from toolbar. Set the mode to color and reduce the opacity. I have set to 65%.

4. For skin I used color #fccea9. For hair use dark brown and for costumes use color of your choice. I have also changed the background. Just use your imagination and play around.
Here's the final result:

Tuesday, May 20

Convert image into sketch

Today we are going to see how to convert your picture to a sketch.

1. Open any image of your choice. Duplicate the image by selecting Layer -> Duplicate layer.

2. With the duplicate layer selected go to Image -> Adjustments -> Desaturate.


Again duplicate this desaturated layer. Now go to Image -> Adjustments -> Invert.


Change the blend mode to color dodge. This will make the image white.

3. Now go to Filter -> Blur -> Gaussian blur. Change the radius to achieve the sketch effect. I used 4.9pixels. But it will vary on the image you selected. So try which radius range suits your image.
Heres the final result:

Friday, May 16

Create shiny text.


This is the most simple and easiest way to create shiny and glossy text.

1. Open a new document with size of your choice. Using text tool and choose any text.

2.Double click the text layer to apply following settings:


Adjust the graph of the gloss contour as:


3.So the final result is:

Tuesday, May 13

Create realistic water droplet

This tutorial is about creating realistic water drop. I have chosen a pic of leaf

1. Open the image. Select elliptical marquee tool and drag on the image. Click ctrl+J. This will create a new layer.

2. With the new layer selected choose Filter -> Distort -> Spherize. Choose amount to 100% and mode to normal and click ok.

3. Double click the new layer to open layer style window and apply the following settings.


4. Choose blur tool and apply it on the edges of drop shadow so that the edges don't look very sharp.

So the pic looks like.


5. Ctrl click the new layer to select it and create a new layer(layer 2). Now choose white color from color box. Select gradient tool and select the 2nd gradient preset(Foreground to transparent). Pressing shift key drag from left top to bottom right of the selection.


6. Click ctrl+T and reduce the width and height to 90%. Press enter to apply. Click ctrl+D to deselect the selection.

7. Reduce the opacity to 50%. Now using blur tool blur the edge of the reflection to make the edges blur. So the result is:

Saturday, May 10

Photo filled text effect

This tutorial is about filling the text with any image. Sometimes it will be very boring to give text only colors, gradient effects or preset patterns of adobe photoshop. Why not try fill the text with images?

1.Open an image of your choice. I have selected an image of clouds.


2.Using type tool enter any text.


3.Make a copy of background layer, by clicking and dragging the background layer in the layer palette onto the New layer icon.

4.Select background layer(NOT background copy) in the layers palette, choose Edit -> Fill, and then choose white color to clear the original flower background.

5.Drag the text layer so that it is between the background and the background copy layer. The text disappears.

6. Select the background copy layer in the layers palette, and in the layers menu, select create clipping mask(Alt+Ctrl+G), and see the result.


7.Double click the text layer and apply the following layer styles:


So the final outcome is:


Hope you all enjoyed the tutorial. If you have any queries add it in comments.
Have a great day!!!!

Friday, May 9

Brighten your yellowish teeth with photoshop.

Are you worrying about yellowish teeth in your photos? You can make your teeth whitest white by using photoshop.
I'm gonna choose this picture with yellow teeth and convert into whitest teeth.


1.To whiten the teeth select the dodge tool in the toolbox. Make the option seeings range: Midtones, Exposure:30%. Change the brush size so it is small enough to paint the teeth without touching the gums.

2.Paint the teeth just enough to make them slightly brighter. Don't make it very bright so that it looks artificial.
See the outcome:


Hope you all enjoyed the tutorial. If you have any queries add it in comments.
Have a great day!!!!

Thursday, May 8

Remove blemishes and any imperfections from your photo using Photoshop (TIPS)

Do you feel bad about blemishes or imperfections in your photo? Don't worry anymore. You can simply remove those and can reveal smooth blemish-free face in your photos. HOW? Use Spot healing brush.

The Spot Healing Brush tool quickly removes blemishes and other imperfections in your photos. The Spot Healing Brush works similarly to the Healing Brush: it paints with sampled pixels from an image or pattern and matches the texture, lighting, transparency, and shading of the sampled pixels to the pixels being healed. Unlike the Healing Brush, the Spot Healing Brush doesn’t require you to specify a sample spot. The Spot Healing Brush automatically samples from around the retouched area.

1. Select the Spot Healing Brush tool from the toolbox. If necessary, click either the Healing Brush tool, Patch tool, or Red Eye tool to show the hidden tools and make your selection.

2. Choose a brush size in the options bar. A brush that is slightly larger than the area you want to fix works best so that you can cover the entire area with one click.

3. Click the area you want to fix, or click and drag to smooth over imperfections in a larger area.

Wednesday, May 7

Glossy button for web pages

This tutorial is for creating button for using in web pages. I have kept the resolution to 72pixels/inch which is suitable for web pages.

1. Create a new document with following settings:


2.Select rounded rectangle tool from tool bar and draw a rounded rectangle with radius 35px and color #00a2ff.


3.Create a new layer. Select rounded rectangle tool and draw above the already drawn rectangle. Now ctrl click the new layer and press delete button so that it looks like:


4.Select white color from color box. Click gradient tool and select second gradient effect from gradient editor.


5.Drag the gradient from top to bottom by holding shift key.


6.Add some text of your choice. Add some shadow effect to the text.


So here is the final result:


Hope you all enjoyed the tutorial. If you have any queries add it in comments.
Have a great day!!!!

Tuesday, May 6

Glossy text

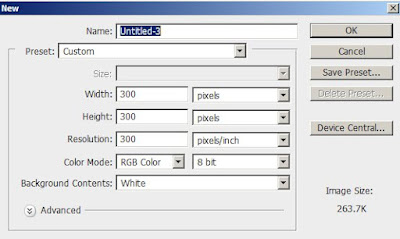
1.Create a new document with following settings


2.Select paint bucket tool from toolbar and fill the background layer with color of your choice. I have used color #c7d9ff

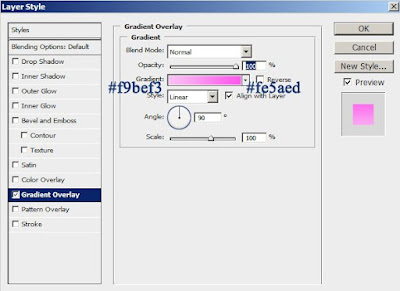
3.Using type tool type some text. Double click the text layer in the layer palette to open layer style window. And select gradient overlay and apply following settings:


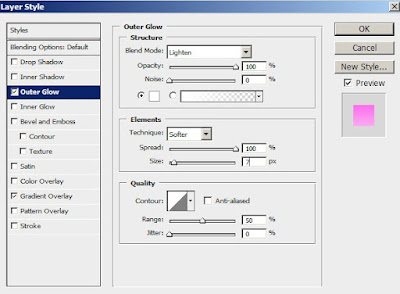
4.Then select Outerglow and apply following settings:


So you have following results:


5.Create a new layer. Now with the new layer selected, ctrl click the text layer. Now contract the selection by 1pixel from Select -> Modify -> Contract.
Now select rectangular marquee tool. Cut the bottom half of the selection by clicking alt and selecting the bottom half of the selection.


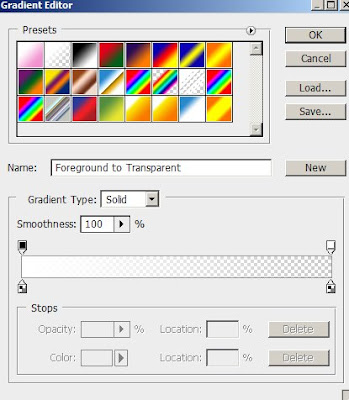
6.Now select white color from the color box. Now select gradient tool. From gradient editor select the second gradient from preset list.


7.Now fill the text from top to bottom by holding shift key.


8.Select the first 2 layer by ctrl clicking. Now right click and select link layers. Again right click and select merge layers.

9.Right click the first layer and select duplicate layer. By selecting duplicate layer choose Edit -> Transform -> Flip vertical. Move down the flipped layer so that it looks like:


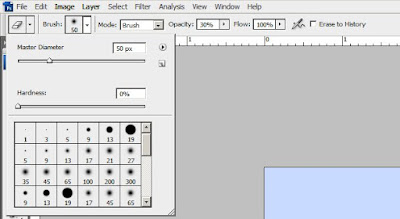
10.Change the opacity of the flipped layer to 30%. Select eraser tool and make following settings:


11.Erase the bottom half f the flipped layer to achieve the final result:


Hope you all enjoyed the tutorial. If you have any queries add it in comments.
Have a great day!!!!

Saturday, May 3

(NOTE:This can alo be created using adobe photoshop. Here I have used adobe photoshop elements 5)


1:Create a new blank file and place an image of your choice in a new layer.

2:Open texturize filter from menu Filter -> Texture -> Texturizer and apply following settings:


So the result will be:


3:Now select the background layer and select from menu Image -> Resize -> Canvas size. And apply following settings:


4:From artwork and effects palette select a background texture and apply.


5:To seperate individual puzzle pieces, use the magnetic lasso tool to define a selection that follows the edge of the pieces. Once the selection is defined, make the selected pieces into its own layer.


6:Now use free transformation tool to rotate each puzzle pieces. Applying drop shadow layer styles to create an illusion.
Also rotate the original image to get the following result:


For web designing video tutorials Click Here!

Friday, May 2

Sorry as I was not able to update new tutorials as I was pretty busy with my work.
I'm gonna add a new tutorial tomorrow. The tutorial is about adding puzzle effect to a photo using photoshop elements5.
So see you tomorrow.